
SteadyTune Manual
Tuning In – Quick Start
Once you’ve opened the SteadyTune application, you’ll see its icon appear in the menu bar at the upper-right corner of your screen. From there, you can simply click it to show the SteadyTune window. By default, SteadyTune is set to listen for incoming audio via whichever Input device is selected in System Preferences’ Sound pane. If you haven’t changed this setting it is usually set to the Built-In Microphone, so if you whistle or sing you will see the pitch of those notes displayed immediately.
You can see the level of the input signal in the meter at the lower-right of the window. If it’s low (i.e., if it's only the lower green bars that light up when you make sounds), try moving your instrument closer to the microphone – a healthy signal means the tuner can work at its best.
If you’re tuning an acoustic instrument, you’re ready to go! Simply pick it up and pluck a string, and SteadyTune will display frequency and pitch in the tuner window. By default, SteadyTune is set to use All Notes mode, meaning any note you play will be detected and analyzed. This means that whether you’re playing an acoustic guitar, a banjo, a cello, or even simply singing or whistling, SteadyTune will intelligently tell you whether you’re sharp or flat.
If you're using an instrument connected to your Mac with a cable, or you'd like to listen with a different microphone, right-click on the SteadyTune icon in the menu bar, and select Preferences.... From there, you can select the Input device you'd like to use, and any specific channel within that device that your instrument or microphone is hooked up to.
Manual Index
| Tuning 101 |
Reference Pitches |
| The Tuner Window |
Keyboard Shortcut |
| Instruments |
Other Options |
| Alternate Tunings |
Contacting Us |
| Input Devices |
Tuning 101
The process of tuning your instrument makes sure that each string is playing the correct pitch when it is plucked. Learning to tune quickly is crucial for all musicians, since it is your responsibility to make sure your instrument will play nicely with other musicians, or anything else you’re playing along to. You’ll soon lose friends (and bandmates!) if you’re out of tune.
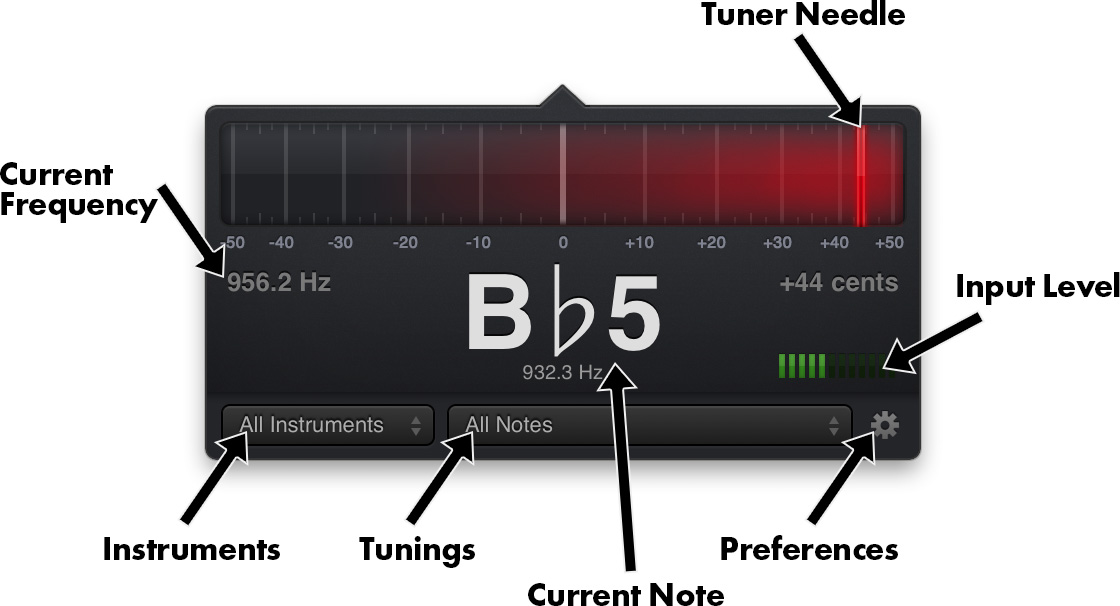
Once you have set up SteadyTune to listen to your instrument (as per the Quick Start instructions above), begin by plucking its lowest string (that is, the string which makes the lowest-pitched sound). You’ll see the needle (the red bar) in the tuner window begin moving, and a note name being displayed beneath it. This letter represents the current pitch of your string, and the needle shows how close to that pitch you are. If the needle is to the left of the center, you’re flat (tuned too low), and if the needle is to the right of the center, you’re sharp (tuned too high). Let’s fix that!
If you’re flat, tighten the string slowly and slightly, then pluck it again. Hopefully, the needle should have moved a little closer to the center. If you’re sharp, loosen the string instead. Repeat this process slowly, being careful not to tighten the string too sharply, until the needle is as close to the center of the display as possible. When you start getting close, the red highlight will turn green, letting you know you’re on the right track! Once you’re there, pluck again, and let the note ring out for as long as you can. The needle should stay nicely anchored in the center, and that string is now in tune!
Repeat this process for all of the strings on your instrument. It’s a good idea to go over them all again once you’ve finished, as the tension in your instrument’s neck may have changed as you tightened and loosened the strings, and by the time you finished with the last one, the first one may have jumped out a little. Don’t be discouraged, just keep cycling through the strings until all of them are ready. Once they’re ready, so are you, so get rocking!
The Tuner Window
The tuner window gives you a range of additional information besides the needle and note name. You can see the pitch of the note you’re playing at the center-left of the window, and the number of cents above or below the target note you are at the center-right. A cent is an increment of 1/100th of a semitone, so don’t sweat it too much if you’re just a few cents out! You can also see the current Reference pitch at the lower-left of the window. Below the name of the detected note, you can see the frequency which that note should be with your chosen reference pitch. For more information on reference pitches, head to the Reference Pitches section of this manual.
Instruments
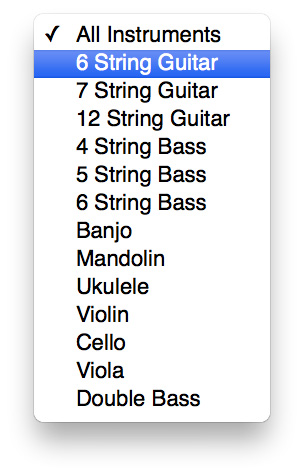
While SteadyTune’s All Notes mode is a great way to tune your instrument, the detection is even better if you select which instrument you’re tuning. This means that SteadyTune can hone in on the frequencies it expects to hear from that instrument. To select your instrument, open the Tuner window by clicking SteadyTune’s icon in the menu bar, or pushing a defined keyboard shortcut, and select the Instrument drop-down menu beneath the tuner. By default, SteadyTune is set to a standard 6 String Guitar, but you can select from several other options including 7 String Guitars, 4, 5, and 6 String Basses, Banjo, Ukulele, and Mandolin. If you’re tuning an instrument not in the list, you can select No Instrument to operate in a more generalized mode which is useful for instruments from violins and cellos to the human voice!
Alternate Tunings
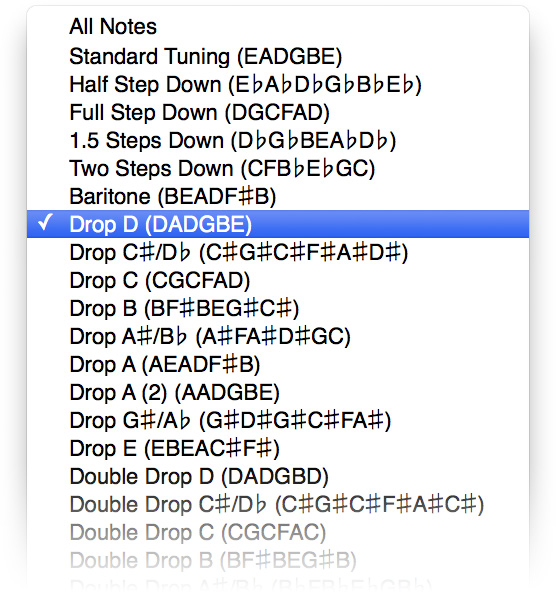
Bursting to try DADGAD tuning? Want to try an open G tuning for some simpler chord shapes? Alternate Tunings are your friends! After selecting the instrument you’re tuning in the Instrument drop-down menu, click on the Tuning drop-down menu beside it. Here, you can choose from dozens of available alternate tunings, including Drop D, DADGAD, Half Step Down (Hendrix) tuning, and many more. Alternate Tunings are available for all pre-defined instruments, including guitar, bass, banjo, mandolin and ukulele. You can also select All Notes mode if you’re trying out a different tuning. If you’d like to see a tuning included which we haven’t covered, please get in touch and let us know!
Input Devices
If your instrument has a direct input to your Mac (such as via a jack cable or an audio interface), or if you want to use a different microphone as an input, you can change your active Input device in SteadyTune’s Preferences window (⌘+,).
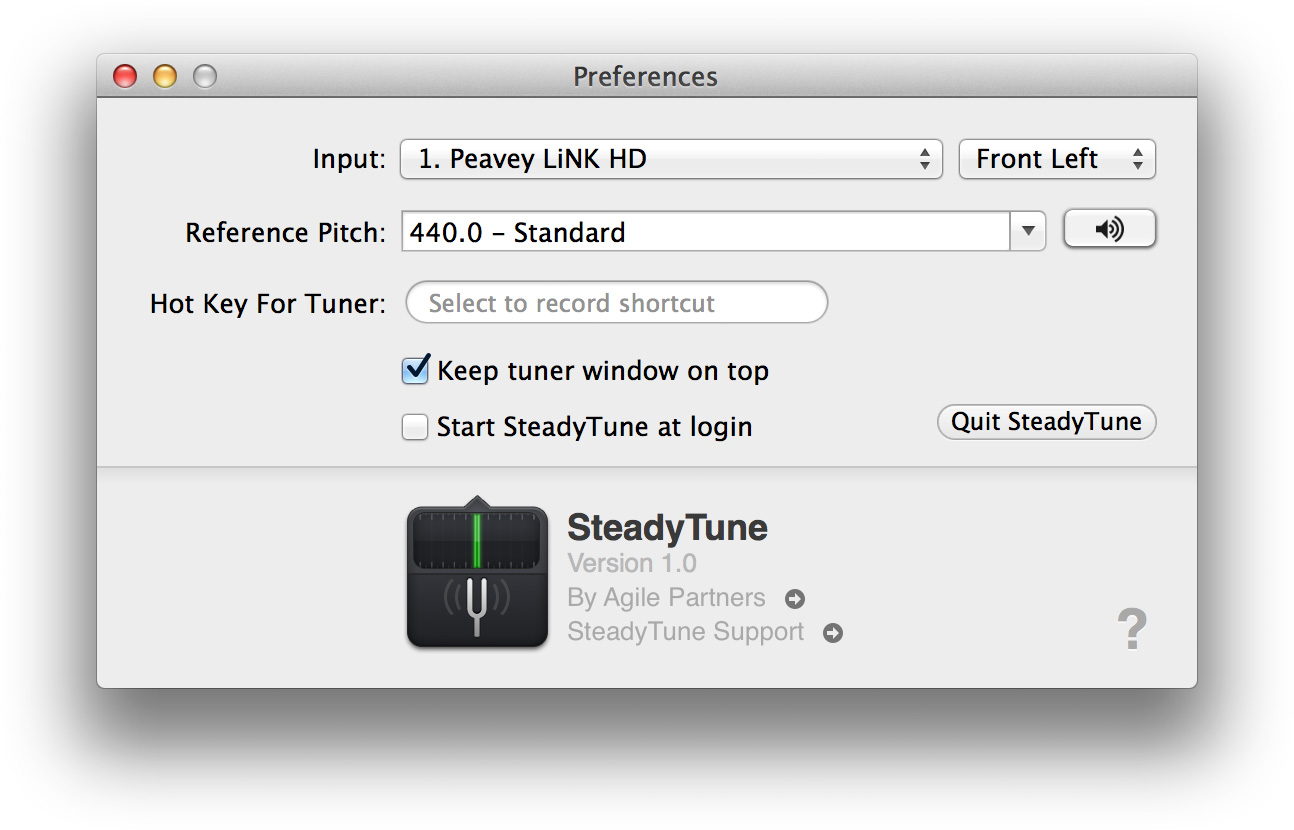
From the Preferences window, you can click on the Input drop-down menu and choose from any of the compatible audio devices currently connected to your Mac. If your chosen device has multiple inputs, you can select which you’d like to use by using the smaller drop-down menu beside the Input drop-down. If you aren’t sure which input corresponds to which connection on your device, consult the manual that came with the device.
Reference Pitches
If you’d like to tune your instrument to a reference pitch other than the standard of 440 Hz, you can do so in the Preferences window (⌘+,). You can select in increments of 0.5 Hz, from 392 Hz (used in French Baroque music) to 528 Hz (a frequency famous for its link to genetics). By convention, the Reference Pitch is the frequency (in Hertz, Hz) of the A note above middle C. By raising or lowering that value, the value of all other tuned notes changes, meaning the overall pitch of your instrument is raised or lowered. Several preset pitches are included, and you can view them by clicking the Reference Pitch drop-down menu. To preview a reference pitch, click the speaker icon beside the drop-down menu.
Keyboard Shortcuts
SteadyTune can be toggled with a user-selectable keyboard shortcut, available system-wide. As long as SteadyTune is running and sitting in your menu bar, this shortcut will bring it to the foreground for immediate access to your tuner – perfect for a quick check between recording takes! If you’d like to set a keyboard shortcut, click ‘Select to record shortcut’ beside Hot Key For Tuner in the Preferences window (⌘+,). Please note that shortcuts created here will override any existing shortcuts available elsewhere on your Mac.
Other Options
You can also check ‘Keep tuner window on top’ to prevent other windows from hiding SteadyTune’s tuner window whenever it is visible. This option is perfect for keeping your tuner visible at all times, even when recording in other applications or playing along to your favorite songs in iTunes.
Checking ‘Start SteadyTune at login’ will cause SteadyTune to automatically launch when you switch on your Mac. It will sit quietly in your menu bar until you need it, and you can launch it via its keyboard shortcut or clicking its icon. This option is great if you require frequent access to your tuner. SteadyTune uses minimal system resources when its window is closed, and so can be left running at all times without causing slowdown in other applications.
If you want to quit SteadyTune, you can do so by clicking ‘Quit SteadyTune’ in the Preferences window, or by quitting the application in the normal way (by right-clicking its icon in either the Dock or the menu bar and selecting Quit, or by pushing ⌘+Q) when the tuner or Preferences windows are visible.
Contacting Us
We love to hear your feedback! If you have any questions, comments, suggestions or feedback about SteadyTune, or if you’d just like to let us know that you’re enjoying the app, you can contact us by clicking ‘SteadyTune Support’ in the Preferences window. You can also click ‘By Agile Partners’ to see information on our range of other applications for OS X and iOS.
