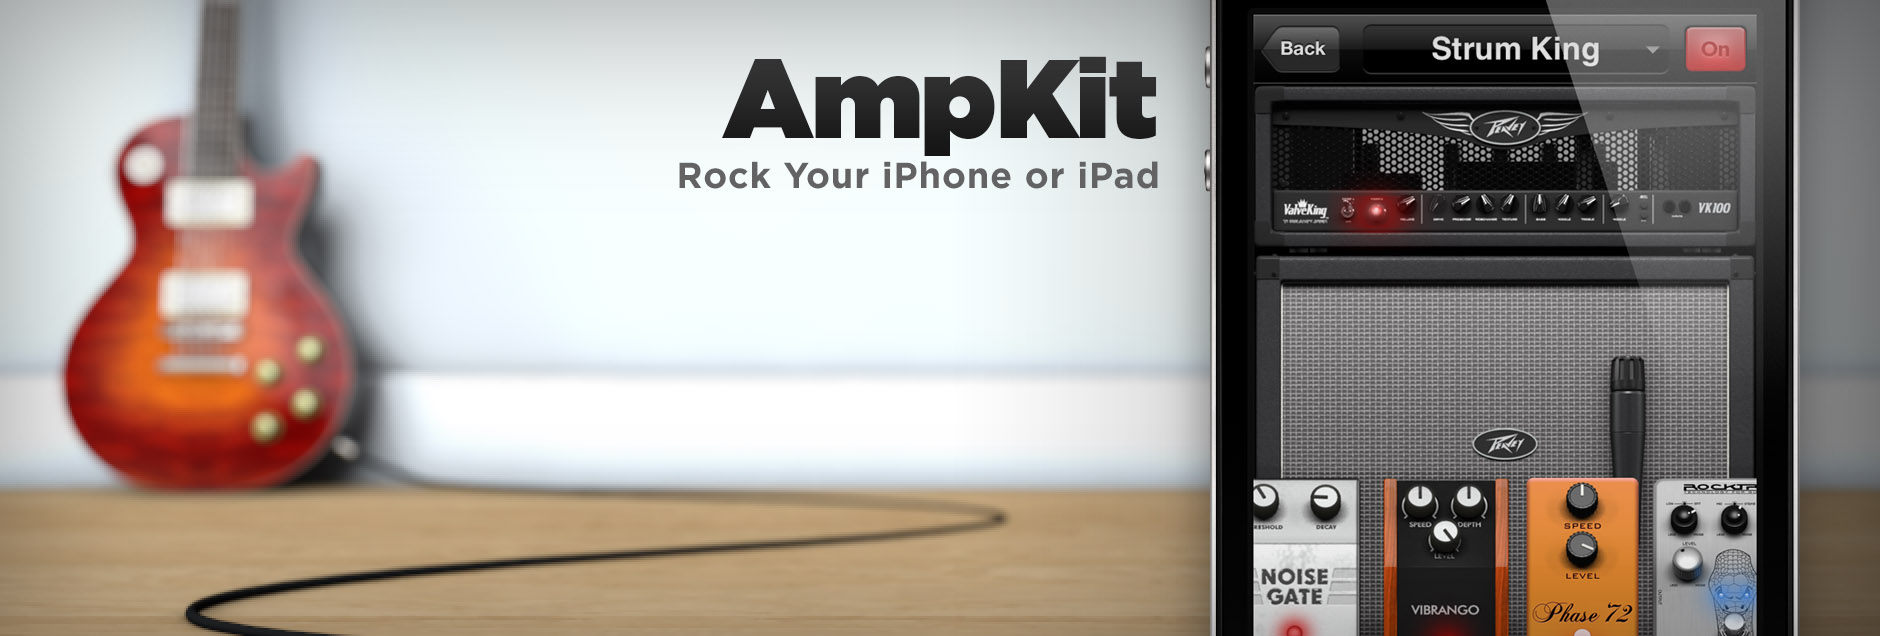
AmpKit Manual
Ready to play?
Follow these quick steps to get you up and running. Remember, AmpKit is modeled after real-world amplifiers. Like any real amp, you'll want to make a few adjustments to be sure you get the best quality sound.
- Connect your guitar to your iOS device using a compatible interface such as AmpKit LiNK HD, and open AmpKit.
- Tap the default 'New Setup 1' or one of the available Presets from the My Setups or Presets tabs.
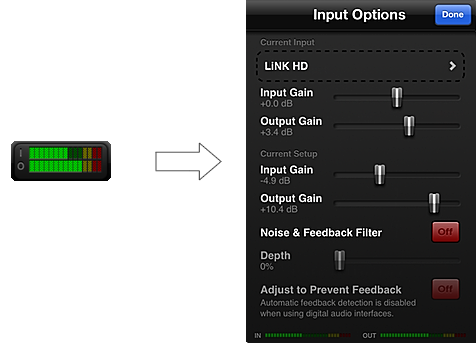
- Tap the Input levels at the lower right corner of your amp display.
- Tap 'Current Input' and select your interface from the list. If using AmpKit LiNK HD, select 'LiNK HD'.
- Adjust the Input and Output Device Gain sliders until your loudest guitar playing doesn't touch the red bars on the meters at the bottom of the window.*
- Keep playing loudly, and adjust the Preset Input and Output Gain sliders to ensure the strumming stays out of the red bars. Touching the yellow bars is fine, but red bars indicate that your signal is clipping, and you don't want that!†
- If you want to crank your amplifier's volume for a more saturated sound, or dial it back for a more pure clean tone, remember to adjust the Output Gain control under 'Current Setup' accordingly, bearing our recommendations in mind.
- Tap 'Done' (or tap outside the Input Options window on iPad) to go back to your amp. Now get rocking!
- If you want to try a distorted sound, open the Peavey ValveKing amplifier's parameters by tapping on it, then tapping to change the Channel to Lead.

* Device Gain is saved per device, so you only need to set it the first time you use AmpKit, or if you change audio interface or guitar.
† Preset Gain is saved per Setup/Preset, so it's a good idea to make this adjustment any time you're creating or editing a rig to keep it in tip-top shape!
Index
Creating & Tweaking Setups
Presets
Recording & Re-Amping
Adding & Restoring Gear
Help With Interfaces
More Info
Glossary
Creating & Tweaking Setups
All of your Setups are stored in the My Setups panel.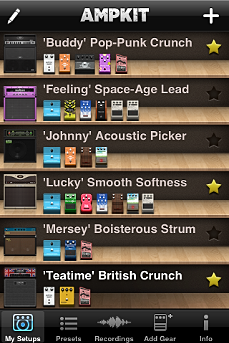
Creating a new Setup
To create a new amp Setup, tap the "+" icon at the top right of the My Setups screen. A default Setup called "New Setup" will be created. Tap the "New Setup" to enter the gear view, where you can begin sculpting your dream rig.
Selecting an Amp Head
To select an amp head, tap the top of the amp, above the speaker cabinet. You will see your current amp head with a brief description, and all of its available settings. To see a more detailed description of the amplifier, tap the "i" icon next to the text. Tap the amp head again here to open the amp selector. You will see a list of your available amp heads and below those, a list of those available for purchase, along with keywords that tell you what kind of sound that amp offers, such as Clean, Distortion, Blues, or Jazz. If you select an amp head that you haven't purchased, you will be shown a screen where you can hear what the amp sounds like, and purchase it for immediate use. Any amp head that you purchase will automatically come with any related speaker cabinets.  To hear the preview, tap the black speaker icon.
Tap the "Back" button (or close the popover panel on iPad) to return to your Setup, and you will see your amp head at the top of your rig. To adjust the settings of the amp, tap it again and modify the parameters by sliding your finger across them or tapping to switch between channels and enable options like Bright, Crunch, Modern, or Hi impedence modes.
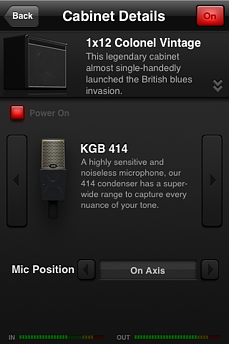
Selecting Cabinets and Microphones
Tap the speaker cabinet in your Setup to open the Cabinet Details panel, and select a different cabinet or microphone. On this screen, you can tap your cabinet to select from any of the speaker cabinets available. Cabinets are bundled with amp heads, so if you want more cabinets to choose from, purchase more amps in the Gear Store, or from the amp selection screen as described in "Selecting an Amp Head" above. Each cabinet also includes keywords such as Bright, Warm or Versatile to give you an idea of what types of sound they're best suited to.To change the microphone, use the left and right buttons on the Cabinet Details panel to switch between your available mics. Additional mics are available for purchase in the Gear Store. Select "On Axis" to position the microphone directly against the center of the speaker cone for a more direct, vibrant sound, or go "Off Axis" for a slanted position that captures slightly more of the modeled environment. "Distant" mode positions the microphone at a distance of 50 centimetres from the cabinet, capturing even more of the ambient environment, for a more laid-back feel. Some cabinets also offer separate microphone configurations for tweeters and speaker horns, such as the Trace Elliot 1x15.
AmpKit offers two free microphones: the dynamic Workhorse 57 starter mic, which is a perfect partner for guitar rigs due to its contoured frequency response and additional presence boost, and the Germann 87 condenser, a more subtle and nuanced microphone modeled after a world-leading design, which is a great model to use for both bass and guitar rigs thanks to its warmth and naturally balanced response. Purchasers of AmpKit+ (or the AmpKit+ Bundle) can use six additional microphones covering three additional dynamic models, and three more condensers.
When you select "Back" (or close the popover panel on iPad), you will be returned to your rig, with your newly-selected gear on display and ready for use.
Adding Effect Pedals
It's time to start adding effects! Tap the grey "+" icon near the lower right of your cabinet to add a pedal from the Pedal Details panel at any time (if your existing Setup already has a lot of pedals, you may need to swipe to the left or right to see it). You will see a default Noise Gate pedal, and its available settings. To select the pedal you'd like, tap the pedal description at the top of the settings to open the pedal selector, which lists all of your available effects, as well as those available for purchase in the Gear Store.
If you select a pedal you haven't purchased yet, you will be shown a screen where you can listen to an example of the pedal in action. To hear the preview, tap the black speaker icon. From here, you have the option to purchase and download the pedal for immediate use.
Managing your Pedals
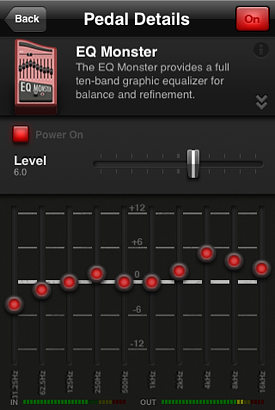
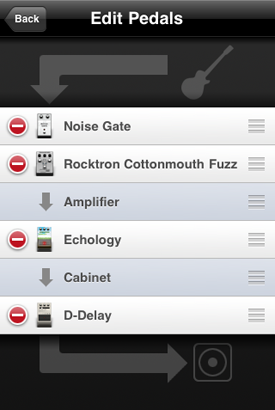
The next step is to tailor your pedals to your exact liking. You can change the settings of any pedal from the amp screen by tapping the top of the pedal (tapping the bottom half of the pedal stomps it, switching it on or off). You can continue to play through your instrument as you adjust the settings to fine tune the output as you play. Tap "Back" (or close the popover on iPad) to return to the stack view. Some pedals, such as the EQ Monster shown here, have different types of controls, so be sure to experiment with all of the possible options to learn exactly what your pedals are capable of!The order of your pedal effects is important, and in AmpKit, pedals are ordered from left to right onscreen. To change the order of your pedals, or remove them all together, tap the pencil icon near the far right of your pedal chain to open the Edit Pedals screen.  From this screen, you can use the horizontal bars on the right of each pedal to drag it up or down in your pedal order. The graphics indicate where your guitar enters, and where the sound is outputted to your headphones or speakers (from top to bottom!). To remove a pedal from your Setup, tap the red dot next to the pedal, and then tap "Delete". If you want to simulate an FX Loop by placing effects after the amplifier's pre-amp stage, or even place them after the cabinet as mastering effects, you can also drag around the amplifier and cabinet in the same way as the effects. Here's a hint: effects like reverb and delay work best after the amplifier, and effects like wah and EQ can sound drastically different depending on their position in the chain. Be sure to experiment and see how each pedal performs when placed in different positions.
Don't worry about ever losing any of your gear! If you remove a purchased pedal from a Setup, you will always have the option to add that pedal back to your Setup later. In fact, you can add it as many times as you like to create crazy stacked, polyrhythmic delays, huge, echoing reverb rooms, or crushing, multi-stage compressors.
Virtual Pedalboard Mode
If you want to connect AmpKit to your physical amplifier and cabinet, applying AmpKit's amplifier and cabinet modeling then your amp's own sound can give less-than-optimal performance. If you want to use AmpKit as a virtual pedalboard without using amp or cabinet modeling, you can tap the amp or cab, then tap "Power On" in the upper-left to switch these components off. If both the amplifier and cabinet are switched off, your guitar signal will be passed directly to the pedal effects, and then out again, making it perfect to feed into your physical wah pedal or amp's guitar input to combine with those vacuum tubes and your vintage fuzz wah!
Tweaking Setups
Input and Output
You want to get the best possible sound out of your AmpKit Setup. Remember to frequently check your input and output meters at the bottom right of your amp. Both levels should be topping out near the yellow bars, without spending time in the red.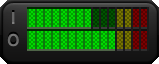 Any time you need to adjust the input/output gain, you can tap the meters to fine tune.*
 From the Input Options screen, you can also turn on AmpKit's built-in Noise & Feedback filter, which can filter out unwanted hiss or hum. Toggle it in with the red On/Off button, and drag the slider to set how heavily the filter is applied.
*Any time you make major changes to a Setup, it's a good idea to re-check your Input/Output settings under Current Setup. You should only need to change those under Current Input if you change which guitar you're using, or change your input interface.
When using a headset-connected interface, the Noise & Feedback filter will automatically enable itself if it detects unwanted feedback. AmpKit uses intelligent detection to search for and eliminate feedback, and if turning on the Noise & Feedback filter is not deemed to have solved your feedback, the Output Gain will automatically be lowered until it is under control. You can switch the filter off again by tapping the red On/Off switch, or disable the feedback prevention entirely by tapping On/Off next to "Adjust to Prevent Feedback".
Gain Management
Since AmpKit's amp channels are modeled authentically, the amp's volume control is realistic – it emulates the tube saturation and overdrive which is introduced at higher volumes of real-world play. Touring guitarists the world over make use of this saturation to give additional edge to their tone, and with AmpKit, you can too! AmpKit faithfully recreates this behavior, but with one important difference: the Current Setup Output Gain slider means you can achieve that tube push and crunch at any volume you'd like!
The key to getting a great tone (no matter what amp volume you choose) is to balance that volume with the Current Setup Output Gain control. As a general rule, if you're pushing the amp into overdrive*, it's getting louder, and to avoid clipping you should pull your Current Setup Output Gain control back below the 0.0 dB level. If you're pulling the amp back to softer and more pure clean sounds, to get the overall output loud enough you should push your Current Setup Output Gain up beyond 0.0 dB. If you're playing in the style you'd like and the meters are spending most of their time in the yellow area, you're set up correctly. If you see red bars, turn your Current Setup Output Gain down, and if you're seeing the meters in the low green area, turn it up!
* Just like in the real world, every amplifier is different, but AmpKit is calibrated so that an amp volume of around 7.0 will produce a healthy yellow signal with the default gain settings of around 0.0 dB.
Editing Your Setups
Every component of your amp Setup can be edited. At any time, you can tap the amp head, the cabinet, or the top of any of your pedals to open the settings screen for each. To find out more about adding, editing or changing your components, see the "My Setups" and "Gear Store" sections of this user manual.
 Tuner and Metronome
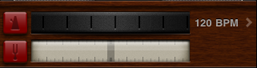
Tap the Tuner/Metronome icon at the bottom center of your amp screen to open the tuning and metronome options. In the panel that appears, the jog wheel adjusts the tempo of your metronome. You can start the metronome by tapping the red button to the left of that wheel. To adjust the metronome's settings, tap the > icon (on iPhone and iPod touch) or the Gears icon (on iPad), and from the Metronome panel you can choose from over twenty pairs of metronome sounds and a dozen time signatures, and also adjust the volume of the metronome relative to your own input and Backing Tracks.
 The other bar is a simple but highly accurate tuner, based on the same precision technology we created for GuitarToolkit. Pluck a string and you will see the resulting note and frequency, allowing you to make sure you're never sharp or flat! The tuner will continue to respond even if you have turned your rig off by using the red On/Off button in the upper-right of the screen – perfect for silent tuning.
 Options
Access the Options screen by tapping the Gears icon beside the Tuner/Metronome icon at the bottom of the screen. Here, you can enable multitasking, control your backing tracks, enable stereo output, switch output modes, and set your recording options.
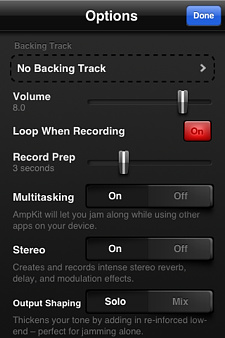 You can use the Options screen to select a Backing Track to play or record along with. Tap the "Backing Track" option to select a track. You can also adjust the volume of the track relative to your own play. To find out more about using and uploading Backing Tracks, see the "Recording & Re-Amping" section of this user manual.
If you want your Backing Track to loop while you're recording (for example, if you're playing along to a drum loop or jamming solo ideas over that kick-ass new middle eight), you can tap the On/Off button beside "Loop When Recording" to enable that feature. "Record Prep" gives you a countdown before recording begins, which gives you a chance to put down your device and grab your pick, ready to start playing.
From the Options screen, you can also enable Multitasking Audio, meaning even when you leave AmpKit to use other apps, you can continue to rock! This is perfect for playing along to a celebrity tutorial in Lick of the Day, tablature of your favorite song in TabToolkit, or jamming along to radio apps.
You can also choose to enable Stereo from the Options screen. Stereo mode creates powerful and impressive stereo reverb, delay, and modulation effects, at a price of larger recording file sizes and slightly increased battery usage. If you'd prefer to switch Stereo mode off to conserve power, you can do so here.
The last option on the Options screen is the Output Shaping selector, which enables you to select Solo or Mix mode. Solo mode widens the frequency range of your instrument slightly to provide accented bass resonance. We discovered that when playing alone, a little extra bass adds a world of warmth to your tone, that a bassist would normally provide. You can also select Mix mode, which does not add in the additional resonance, which works perfectly for fitting your guitar into a mix with other instruments when you're jamming with the band!
Recording Sessions
You can record your sessions, then play them back, re-amp them, or export them to other devices. To get started, tap the red light at the bottom left of your amp Setup to open the recording controls. You will be able to see the waveform you are recording scrolling along as you play, and a timer counting the duration of the recording. When you have finished playing, tap the Record button again (it will have turned into a Stop icon when you started recording). Your recording will be saved as a "Session" and you can access it under the "Recordings" panel of the application. If you have selected a Backing Track or Metronome, these will be restarted when the recording begins to ensure you are always in time. If you recorded along to a Backing Track, it will be attached to the Session you record so that you can listen along to it later, or even export it as a complete mix.
QuickJump
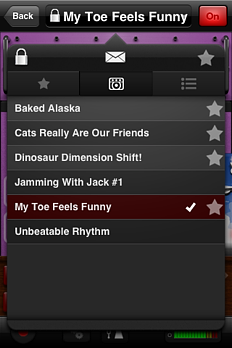 If you want to switch Setups or Presets without leaving the stack, and get greater control over them, QuickJump is your new best friend! To access it, tap the name of the Setup or Preset in the black bar at the top of the screen.
The padlock icon in the upper-left of the QuickJump overlay allows you to lock a Setup, preventing it from any changes until it is unlocked again – perfect for protecting your favorite sounds! Speaking of Favorites, the star icon in the upper-right of the overlay allows you to designate any Setup or Preset as a Favorite. All of your Favorites are easily accessible in their own section of the QuickJump overlay, which is accessed by tapping the star tab on the left of the bottom row (underneath the padlock).
The envelope icon in the upper-middle of the QuickJump overlay allows you to email the Setup you're currently viewing to a friend. A template email will automatically be created in Mail and the Setup will be attached, so just fill in your buddy's email address and hit Send to share the rig.
The three tabs of the QuickJump overlay are the Favorites list, My Setups, and Presets. As you might expect, these contain quickly-accessible lists of everything contained in your My Setups list, and the in-app Presets list, too. If you're changing between two sounds while performing, this is a perfect way to do so quickly with a single tap. If you prefix your Setup names with numbers, 1.. 2.. 3, etc., you can create a mini set list here, too!
Importing Setups
If you have friends or bandmates using AmpKit, they can email you their Setups, and provided you own the necessary gear, you can open those Setups within your AmpKit app and play along!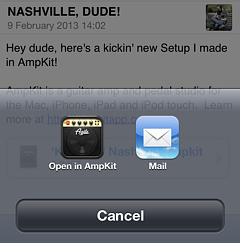 Sending Setups back and forth is a great way to collaboratively improve them, coming up with great shared ideas and perfecting a killer tone!
For information on how to send your Setups to friends, see the QuickJump section of this manual. If you use the Mail application on your iPhone, iPad, or iPod touch, you can tap an AmpKit Setup in an email from a friend and choose to open it in your AmpKit application, ready for use.
Presets
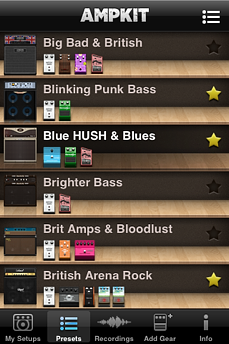 AmpKit ships with over 130 built-in Presets covering a huge range of styles, and making extensive use of all of the gear available in the AmpKit catalog.
Selecting a Preset
To view the Presets that ship with AmpKit, tap the Presets button on the menu at the bottom of the screen (or at the left on iPad). You can then scroll through the list of Presets available. Not all of them will be playable, since the Presets make full use of the wide range of components available in AmpKit's Gear Store. To unlock those Presets, you'll want to add more gear!In the list view, you can see a thumbnail of the amplifier and cabinet which make up that Preset, as well as any effects pedals it uses. If a Preset is listed under "Available Presets", you can tap it to try it out right away! You can also tap the star icon to designate any Preset as a Favorite, making it quickly available in the Favorites menu on iPad, or the QuickJump panel on both iPad and iPhone / iPod touch.
Auditioning a Preset
Once you have tapped an available Preset in the list, you will be taken to the stack and the components and settings for the Preset will be loaded. Go ahead and play - you'll hear the Preset. You can tweak it in the exact same way you would tweak any of your own Setups, and the revised version will be copied into your My Setups list, meaning you can never accidentally modify one of the default Presets. You'll soon learn in quite how many directions you can take any of the default Presets by making changes to each piece of gear in turn, and you'll quickly end up with many different-sounding Setups based on a single Preset.
 Unlocking a Preset
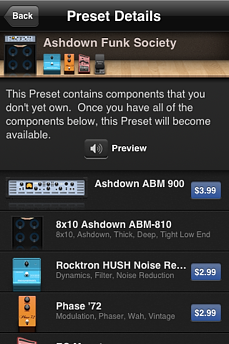
Under "Unavailable Presets", you can see all of the Presets which use components that you haven't yet purchased. You can tap any of them to load the Preset Details view for that Preset, which will show you each of the components found therein. From this screen, you also have buttons that enable you to purchase the components you are missing. As soon as you have all the gear that makes up the Preset, it will become available for use. If you aren't sure whether a Preset is right for you, each one comes with a preview audio clip so you can check out its tone before making the plunge and picking up the gear. Tap the black Preview button to listen to the audio clip.
You do not need the microphone that is used in a Preset to unlock it. If you own all of the necessary components except the mic, it will be substituted with a similar model (either a dynamic or condenser microphone) that you already own. Since AmpKit and AmpKit+ both include at least one dynamic and one condenser microphone, you can always be sure there will be a microphone that suits the Preset. Don't overlook the importance of the microphone – each of AmpKit's eight mic models are unique and can take your rig's overall tone in a completely different direction!
Sorting Presets
In the Presets list, you can click the sort button in the upper-right corner to change the way the list is organized. The default view is simply alphabetical, however you can choose to sort the list by genre as well. Note that unavailable Presets will always remain grayed out, and will always be placed at the bottom of the list.
Recording & Re-Amping
 AmpKit allows you not only to play through awesome amp rigs, but also to record your playing and re-amp sessions. When you record, AmpKit simultaneously records two versions of your audio: a dry and a wet version. The dry version is the unaltered, unedited sound exactly as AmpKit hears it from your guitar, without any of your amplifier or effects modeling applied to it. The wet version is your input after it has been through your signal chain of effects, amplifier, cabinet, and microphone, exactly as you hear it through your headphones or speakers. By recording both of these audio streams simultaneously, AmpKit can always recall the dry sound to run through a different Setup or Preset later.
Recordings
Importing/Exporting
If you haven't purchased a compatible interface such as AmpKit LiNK HD, or if you already have a dry version of the audio you would like to process (for example, if you recorded it elsewhere), you can import it from a Mac or PC on the same WiFi network as your iPhone/iPad/iPod touch into AmpKit via the Upload Audio screen. To access it, select the arrow icon in the upper-right corner of the Recordings screen (and on iPhone or iPod touch, select Upload Audio Files). Doing so will open a screen with an IP address on it; make sure you leave this screen open while proceeding to the next step.On your Mac or PC, open a web browser. Type in the address shown on the Upload Audio screen, and the AmpKit interface will be displayed there. From that window, you can upload both backing tracks and dry recordings, as well as download the wet or dry versions of any recordings you have already made in AmpKit directly onto your computer in WAV format.
To record from a dry recording instead of a live input, head into the Input Options screen from the stack by tapping the meters in the lower right corner, and tap the Current Input button. From here, beneath any connected audio interfaces, you can select any of the Dry Recording Inputs on your device. AmpKit ships with a range of default dry recordings in a variety of styles.
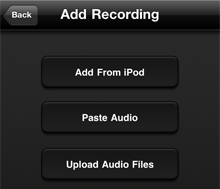 With AmpKit, you can also import audio from your device's Music library, including tracks purchased via iTunes. To do so, tap the arrow icon in the upper-right corner of the Recordings screen, then tap "Add From iPod" (on the iPad, tap Recordings and then tap the music notes icon). From there, you can sort your Music library by Playlists, Artists, Songs, and Albums, and select which song you would like to play along to. Tap the song you'd like, and it will be added to the list of Backing Tracks available from your Options menu.
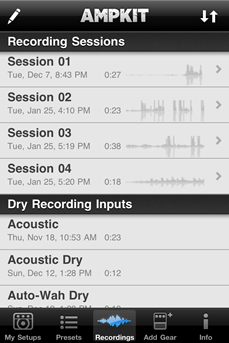
Recording Sessions
Once you've recorded some audio, whether from a dry input or a live instrument, it will appear in the list on the Recordings screen under "Recording Sessions". You will see the date and time at which the session was created, its length, and a small preview of the waveform that was recorded. Tap a recording to open the Session Details screen.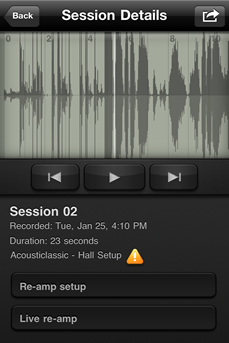 From here, you can tap to swipe through the waveform that you recorded, or use the controls beneath it to play or skip to the beginning or end. The small numbers at the top of the waveform show two-second markers throughout the clip, and two different shades separate the wet and dry waveforms, allowing them both to be viewed at the same time.
You may see an orange triangle alert in this view, next to text showing which Setup or Preset was used to record it. This triangle indicates whether the Setup that you used to record the session has been modified since you recorded it. If you tap the triangle, you are given the option of leaving it with the older settings, or performing an instant re-amp, automatically re-recording the session with your revised parameters.
From the Recordings list, you can click the pencil icon and then click a recording, dry recording input, or backing track, to rename or delete it.
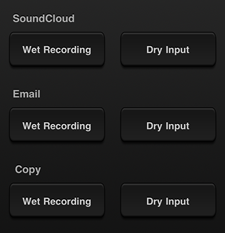 Sending Sessions
It's possible to send a session directly out of AmpKit to a variety of places without needing to use the Upload Audio interface and a Mac or PC. If you tap the arrow icon in the upper right corner of the Session Details view of the recording you wish to send, you will be given a variety of options. For each location, you can choose whether to send the wet or dry recording.
You can send the recording directly to SoundCloud, a great online resource for storing and playing back audio files. You will need to sign up for a free SoundCloud account if you do not have one, but don't worry, the entire process can be performed from within the app in just a few minutes.
You can also email the recording to anybody with an email address. Tapping either the wet or dry button under email will open a pre-made email with your recording as an attachment. You just need to type in the recipient's email address and tap Send, and they'll be enjoying your track soon!
Your recordings can also be exported from AmpKit to a growing number of other iOS applications that support the AudioCopy and AudioPaste standard from Sonoma Wire Works. Simply tap the wet or dry buttons underneath "Copy", then head into your host application and it will show on the audio clipboard and be available for pasting.
You also have the option of exporting your wet recording along with the backing track it was recorded along to. To do this, toggle the switch beside Backing Track to On in the Export Wet panel. If you use Copy to Clipboard, you can then Paste this audio right back into AmpKit as a new Dry Recording – this is a great way to record a rhythm guitar over a drum track, then cycle back around and record a lead riff or solo over the top of them both.
Re-Amping
Re-Amp Setup
From the Session Details view, you can tap the "Re-amp Setup" button to open the Change Setup view. From here, you can toggle between My Setups and Presets, and select any of your existing Setups or available Presets, and tap one. Doing so will instantly give you a preview of that recording played through that rig. If you like what you hear, go ahead and tap Apply! The track will be re-amped automatically, and you will be returned to the Session Details screen. But don't worry, your dry recording is completely safe no matter how many times you decide to do this – with AmpKit, your sessions are never at risk.
Live Re-Amping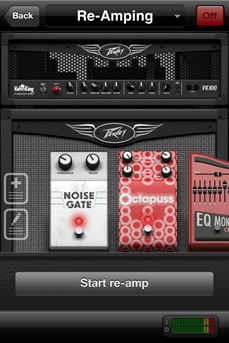
"Live re-amp" is an exciting tool which allows you to tweak the controls of the chosen Setup, and even completely change components in real-time while the audio is being re-amped. This mode is great for adding in precision changes that you might have been too busy to do while playing the part itself. For example, this is a great time to turn on the Tilt function of the Wahba Doo pedal and tilt your device to apply wah at the perfect moments.
Tap "Live re-amp" on the Session Details screen and you will be taken to the gear view. However, in place of the normal record button, you will find one labeled "Start re-amp". Pushing this will begin the re-amping process and from then until the end of the session, any changes you make to the amplifier, cabinet, microphone or pedals will be recorded into the session.
You can tap "Stop re-amp" or "Cancel" at any time during the re-amp to cut the recording short (this is also very useful if you left a little silence at the end of your recording). Once the session reaches its end, the re-amping will automatically stop and you can tap the back button to return to the Session Details screen.
Audiobus
Audiobus is an exciting tool which allows for inter-application audio routing across a growing range of iOS music applications, including synthesizers, virtual instruments, drum machines, multi-track recorders, and more. AmpKit offers comprehensive support with the Audiobus standard, meaning that it can be used as an audio Input, Effects module, or Output application.- By selecting AmpKit as an Input, you can use AmpKit's powerful gain controls to manage the input signal of your instrument from AmpKit LiNK HD or other interfaces and apply amps or effects before sending your signal to other apps for multi-track recording.
- With AmpKit as an Effect Module, you can harness its versatile library of amps, cabs, microphones and pedals to subtly shape or completely transform audio coming from another app such as a synthesizer, digital instrument, or looper, then output it for recording in another app.
- As an Output, AmpKit can capture processed and manipulated audio from a range of other applications before running it through a cranked full-stack (or even just through some reverb or delay!). You can also record or re-amp as normal from within AmpKit while using Audiobus.
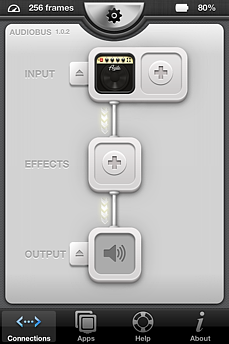
In order to use Audiobus with AmpKit, first purchase the Audiobus application from the App Store, then launch it. Next, tap the plus icon next to the slot into which you'd like to insert AmpKit (an Input, Effect, or Output), and select AmpKit from the list that appears. If AmpKit is not already running, you can tap the icon again to launch it. Next, return to Audiobus and set up any additional audio apps you would like to use in the signal chain.
If you have selected to use AmpKit with a separate Input application, you can select Audiobus as your Input in the Input Options menu in the same way you would select a physically connected guitar or dry recording. You can also control the other applications in your chain from within AmpKit by using the control panel, available by sliding your finger out from the right of your device's screen.
Adding & Restoring Gear
AmpKit's ever-growing Gear Store is a great way to expand your arsenal of amplifiers, cabinets, microphones and pedals, allowing you to add in additional pieces of equipment via In-App Purchase. Tap the Add Gear button in the menu to access the store.
Gear Store
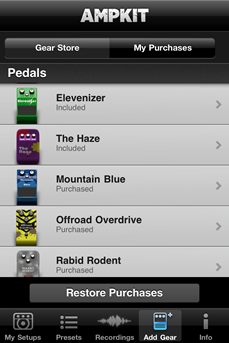
Selecting Gear
From the Gear Store, you can scroll through a list of all available amplifiers, pedals, microphones, and bundles of gear. Cabinets are bundled with amplifiers, which means that whenever you purchase an amplifier, you also receive any associated cabinets with the same purchase.Each piece of gear is listed with a preview, as well as a list of tags to help you see what kind of gear it is. New gear is highlighted with an orange badge. To learn more about any piece of gear, simply tap it.
Previewing and Purchasing Gear
Tap on any piece of gear in the Gear Store, and you will be taken to that item's Details page. From there, you can view a larger image, read a more detailed description of the piece of gear in question, and listen to a preview of it. To do this, tap the black speaker icon to hear a recording made in AmpKit through that piece of hardware.Once you've decided to purchase a component, you can tap the Buy Now button to purchase it at the price shown on the button. This will immediately add the piece of gear to your available gear list, so head back to My Setups to start playing with your new purchase! Also, any of the AmpKit Presets which use that piece of gear (as well as any others you already own) will be added to the Available Presets list, making them immediately available for use.
Bundles
Bundles are a great way to pick up a group of components at a highly discounted price. AmpKit+ can be purchased as a separate application from the App Store or for the same price, you can upgrade the free AmpKit app with the AmpKit+ Upgrade Bundle. Other bundles are also available, each of which offer large numbers of components at substantial discounts!
My Purchases
Restoring Previous Purchases
Tap the My Purchases button on the iPad's menu or in the iPhone's Gear Store and you can see a list of all the gear you currently own. You will also see the Restore Purchases button at the bottom of the list. Tap this button, fill in your Apple ID password, and you will be able to restore all your purchases whether you're rocking on your iPhone, iPod touch, or iPad. We don't believe you should ever have to pay twice for the same piece of equipment, and with AmpKit, you never have to!
Help With Interfaces
AmpKit is compatible with a wide range of audio interfaces by a variety of manufacturers, so provided you have some kind of connector or box to plug your instrument into your iOS device, chances are it will work. We recommend the official AmpKit LiNK HD audio interface from Peavey Electronics, a dock-connected device which provides crystal-clear audio fidelity, zero crosstalk, very low latency, and a host of other benefits including device charging with an optional AC adapter, separate headphone and line outputs, and full Mac support.
Connecting AmpKit LiNK HD
First, plug AmpKit LiNK HD into the dock connector of your device. If you're using headphones, connect them to the rightmost 1/8" jack marked with a headphone icon. You can control the headphone volume using the right knob on the side of the LiNK HD. If you're connecting powered speakers, a PA system, a mixer, or a front of house setup, use the leftmost 1/8" connector, which is a direct line out. You'll also want to set the internal gain level by playing loudly, and adjusting the left knob until the LED does not light red. A red signal indicates a clipping input, and you don't want that!
Since every guitar pickup is different, it’s best to calibrate both of AmpKit’s gain controls to your instrument and the Setups you create. To do this, tap the IN/OUT meters at the lower-right of your Setup to bring up the "Input Options" screen. Under Current Input, adjust the Input and Output Gain sliders until your loudest playing just pushes into the yellow area of the meters. This setting is saved globally, meaning that however your Setups or Presets change, this setting will always remain the same. Next, repeat the process for the sliders beneath Current Setup. This setting is saved on a per-Setup basis, allowing you to customize the gain options for each Setup or Preset you use.
Interface Calibration
If you're having issues with the loudness of your guitar or bass in AmpKit, calibrating your interface can often solve them. Calibration will set AmpKit's own Device Gain settings, meaning just the right amount of your instrument's signal is being provided to AmpKit, meaning it can use it effectively. Let's begin:
- Plug your guitar into your interface, and turn the guitar's own volume control up all the way. Take a look at your interface and see whether it has any gain controls of its own; some interfaces may have physical knobs or sliders on them. AmpKit LiNK HD's left knob controls input gain. Consult your interface's user help or manual, and set its gain controls so that if you play loudly, the gain is at a healthy level. In the case of AmpKit LiNK HD, your loudest playing should not cause the red light on the device to be lit. If your device doesn't have any gain settings of its own, move onto the next step.
- Open AmpKit and create a New Setup by tapping on the "+" in the upper right corner of the screen.
- Switch off the amplifier, cabinet, and Noise Gate pedal by tapping on each in turn and switching its power off.
- Click on the input meters at the lower right of the screen to open the Input Options panel.
- Ensure that the Input Gain and Output Gain sliders under Current Setup at the bottom of the AmpKit window are both in the middle, at a value of 0.0 dB. Doing so will effectively override the Setup entirely, which allows you to calibrate the Current Input's gain on its own.
- Play your guitar loudly (for example by strumming a fat open E chord!), and adjust the Input Gain control under Current Input until the signal coming into AmpKit (the higher of the two meters, marked "I") is within or just below the yellow bars.
- Now, repeat the previous step with the Output Gain slider beneath Current Input, keeping an eye on the lower of the two meters until it too is within or just below the yellow bars.
- Once calibrated, any further gain adjustments should be made via the Input Gain and Output Gain sliders below Current Setup, which will control the gain added by your Setup or Preset, rather than by your interface.
More Information
Info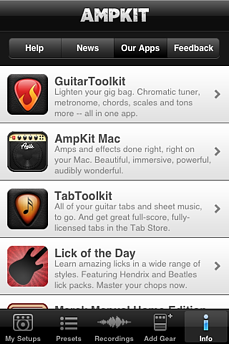
Tap the Info tab on the iPhone or iPod touch, or the More Information button on the iPad's menu, to find the in-app help system. This document will provide you with a variety of information on how to perform tasks within AmpKit, as well as a Frequently Asked Questions section answering the most commonly asked questions about the application.
News
The News tab is a great way to stay in touch with the latest happenings at Agile Partners. Any useful information relating to AmpKit or our other iOS applications including GuitarToolkit and TabToolkit will be displayed here, allowing you to keep up with the new stuff we're working on!
Our Apps
The Our Apps tab contains information on a range of other applications from Agile Partners. By tapping on any of the applications shown there, you can open a separate page giving more detailed information, as well as a link to view it in the App Store.
Feedback
The Feedback tab is your way to talk to us, and we love it when you do! If you ever come across something in AmpKit that isn't working quite the way it should, you can tap "I found a bug!" to file a bug report with us. If you've thought of something cool that could help make AmpKit a more useful or enjoyable application, tap "I've got a suggestion" to let us know. You can also subscribe to our newsletter by tapping the newsletter button here.Glossary
Amplifier Controls:
Microphones:
Distortion Pedals:
Time-Modulation Pedals:
Pitch-Modulation Pedals:
Echology also adds a D-Delay includes a
Octapuss features
Other Pedals:
The Noise Gate allows you to filter unwanted hum, feedback, or noise without causing unwanted change to your guitar's natural qualities. The The Juicer is a compressor which brings down the level of louder tones while increasing the level of softer ones, allowing for greatly increased sustain. The
EQ Monster is a graphic equalizer. It allows you to boost or cut ten guitar-specific frequency bands which cover bass, mid, and treble. You can add or cut 12 dB to each band, as well as control the overall
Wahba Doo is a wah pedal with three unique modes.
The
Recording / Re-Amping Terms:
A A
A