Using External Controls
Ready to Go?
Can't wait to get started? Follow these quick steps to map a control. Come back later and learn about advanced mapping!
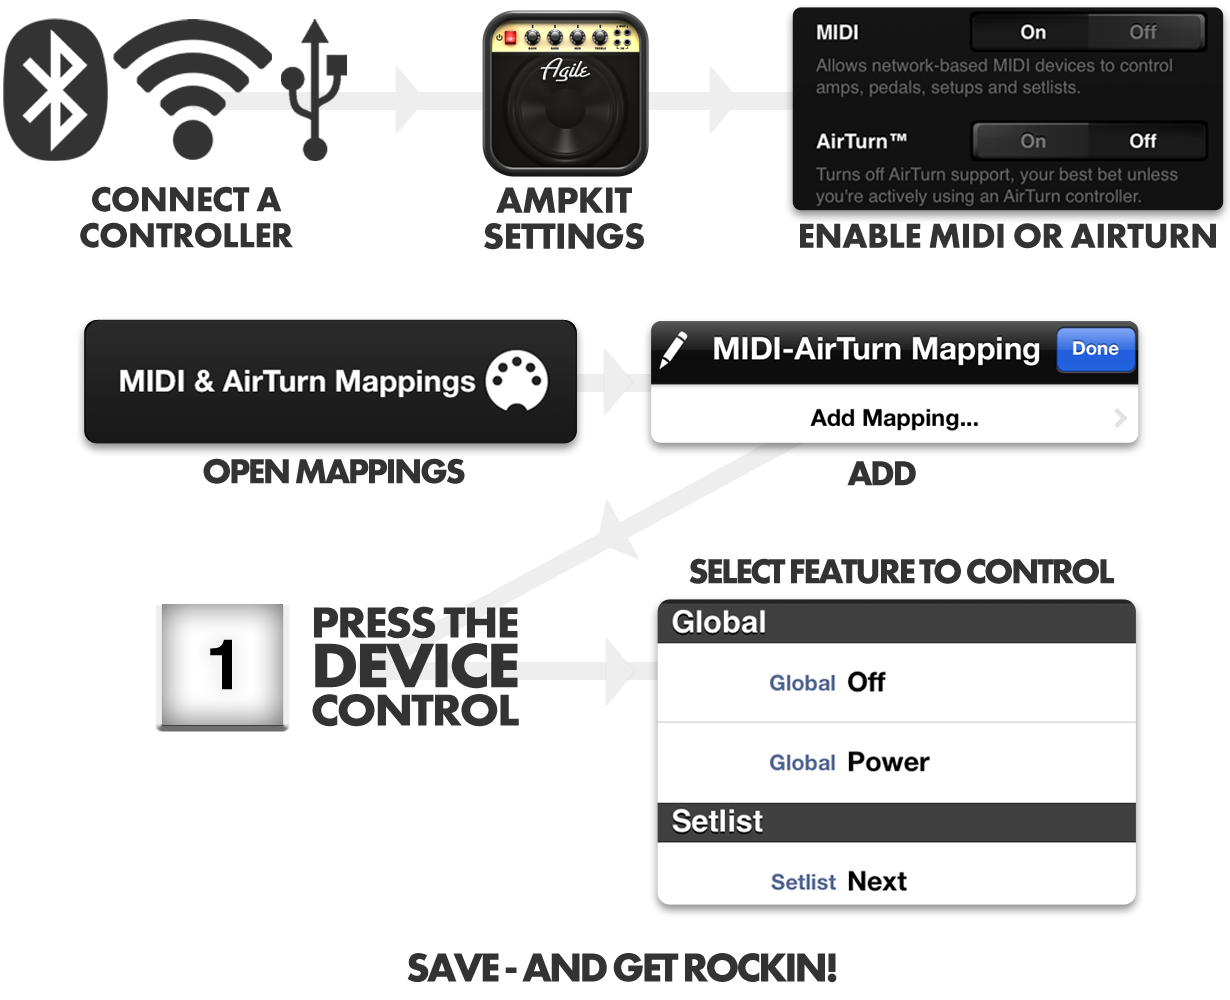
- Connect your external controller
- Go to Settings and turn on MIDI or AirTurn
- Tap "MIDI & AirTurn Mappings"
- Tap "Add Mapping"
- Press a button on your controller
- Select the Parameter you want to control
- Tap "Save"
- Go Play!
Index
Connecting Controller Hardware
Controller Standards: MIDI Versus HID
Wired Setup; The Dock Port Dilemma
Wireless Options
MIDI Apps and Using iOS Devices As Touch Control Surfaces
AmpKit External Control Setup
Multitier Controls
Ignoring, Deleting & Restoring Controls
Control Types
Connecting Controller Hardware
Controller Standards: MIDI Versus HID
The best-known standard for musical instrument controllers is known as MIDI. Apple iOS enables MIDI through their Core MIDI API, and AmpKit supports Core MIDI. So the basic rule of thumb is, if you have a Core MIDI-compliant controller and a way to connect it to your iPad or iPhone, it will work with AmpKit. This includes "stomp switch" type controls as well as "expression pedals" commonly used for wah and volume pedal effects.
Another popular way of controlling iOS apps is through devices that use the wireless (Bluetooth) keyboard standard known as Bluetooth HID. Initially, these Bluetooth controllers were used for foot-controlled page turning in sheet music apps, but enterprising guitarists soon realized that the same foot controls could be used to control other apps including amp & effects apps. AmpKit supports most Bluetooth HID controllers, including the the popular AirTurn™ controllers.
Wired Setup; The Dock Port Dilemma
Connecting conventional wired MIDI controllers to an iPad or iPhone is pretty simple. The main new piece of gear you'll need is an iOS-compatible, Core MIDI compliant MIDI interface, which connects to the iPad / iPhone using the dock port and has cables or jacks to attach standard MIDI controllers. There are many products available from manufacturers such as Tascam, iConnectivity, Alesis, Griffin, Line 6, IK, and others. Just make sure that what you buy is Core MIDI compliant; a number of earlier MIDI interfaces used proprietary protocols and won't work with AmpKit.
There's one potential issue to be aware of, however. iPads and iPhones have a single dock port, based on either the newer Lightning or older 30-pin connector. High-fidelity guitar interfaces, such as Peavey AmpKit LiNK HD, connect using this dock port. This poses a dilemma: if you're already using your dock port to connect your guitar, how can you connect a wired MIDI controller? While there are a few multifunction products that support both guitar and MIDI connections over a single dock port, if you don't happen to own one of these, then you might want to consider a wireless solution.
Wireless Options
One wireless option is Bluetooth, using either a Bluetooth HID controller like AirTurn, or a Core MIDI-compliant Bluetooth interface like BlueBoard. These solutions give you basic stomp switch capabilities and the BlueBoard even supports expression pedals.
If you really need the flexibility to support lots of MIDI devices or already own conventional wired MIDI controllers, AmpKit supports another interesting wireless option: network MIDI. In this scenario, you use a secondary iOS device to connect your MIDI gear—the wired setup described above. Then, using an app like MIDI Designer, you connect via WiFi back to AmpKit on your primary device. In effect, you're giving yourself an extra dock port by using a second iOS device!
MIDI Apps and Using iOS Devices As Touch Control Surfaces
We wanted to mention one final, very interesting external control configuration. If you have extra iPads, etc. available, you can use their touchscreens as AmpKit controllers, even without owning any MIDI hardware! The MIDI Designer app that we mentioned above, for example, allows you to design sophisticated, multi-page on-screen control surfaces. The virtual buttons, sliders, and knobs in a MIDI Designer setup can then connect to AmpKit over WiFi. So you can have amazing secondary touch-control surfaces to give you even more control during live performances.
The most powerful configuration of all is to use a secondary iPad, with a custom MIDI Designer touch surface, but also attach MIDI controllers for those controls like setup and channel switching and wah or volume expression that you do right in the middle of a song and don't want to use your hands for. Amazing stuff!
AmpKit External Control Setup
Multi-tier Controls
AmpKit gives your external controller the most power and flexibility available. It does this by allowing you to set controls at three different levels: Global, Setlist, and Setup.
Global
A Global control will work everywhere within AmpKit. Some ideas for Global controls:
- One button that always turns your stack On/Off
- Advance to the next/previous Setup or Setlist in your current list
- Select the next Amp Channel
- Use your expression pedal to control the Wah position
Global controls can be programmed by going to Settings, then tapping MIDI & AirTurn Mappings. Press "Add Mapping...", and press a button on your external controller. Scroll through the list and select what you want to control with that button.
Setlist
A Setlist control allows you to program controls that will only work within a particular Setlist. Some examples for Setlist controls:
- Advance to the next/previous Setup in this Setlist only
- Control the power of one particular pedal in all setups
- Toggle an amplifier parameter within this Setlist
Setlist level controls can be programmed by opening any Setlist, then tapping "MIDI". Press "Add Mapping..." and press a button on your external controller. Scroll through the list and select what you want to control.
Setup
A Setup level control will only work within the current setup, and nowhere else. Examples of Setup controls:
- Control the Wah Position in the current setup, then
- Control the Tremolo speed in the next setup
- Power a specific pedal or channel in the current setup only
You can program a Setup level control by opening any Setup, then tapping the Options panel. Select "MIDI & AirTurn Mappings" and tap"Add Mapping", then press a button on your external controller. Scroll through the list and select what you want to control.

** Important: While Global and Setlist controls always filter downward, they will not overwrite specific controls that you've set previouslyat the next level down.
For instance. You can set Button 1 of your controller to toggle Elevenizer pedal on/off in a Setup. For this example, we'll call that setup "Nigel's Lair". Whenever you have "Nigel's Lair" open, Button 1 will toggle the Elevenizer on/off.
Later, you can set Button 1 at the global level to power your stack on/off. Button 1 will now power on/off your stacks in all of your setups - but it will continue to power the Elevenizer on/off in "Nigel's Lair", since you programmed that control specifically. How do you undo that? Good question...
Ignoring, Deleting, and Restoring Controls
At some point, you may want to re-program what controls which.
Whenever you open MIDI & AirTurn Mappings, you will see your full list of current mappings. Each mapping will be marked "Defined globally", "Defined in setlist" or "Defined in Setup".
You can alter how those mappings behave at the level you're at by swiping left-to-right through the bar. You will see "Ignore", "Delete" or "Restore".
Ignore
"Ignore" appears whenever you swipe through a control that is set at a level above your current position. Tapping Ignore on any control will render the associated control mapping null. For instance, if you have mapped Button 1 (ex. CC01) to turn off the power at the global or setlist level, you can open the MIDI & AirTurn Mappings panel and swipe through "CCO1" and tap "Ignore" to have that button do nothing at the current level.
Delete
Similarly, "Delete" appears when you swipe through a control that is set at your current position. Tapping "Delete" will remove that mapping completely.
Restore
If you have Ignored a control, it will appear with a gray background and be noted as "disabled...". Swipe through that control again and tap "Restore" to allow that control to be used again.Control Types
You'll notice that there are a few different toggles when you add a mapping. Each controls a specific feature of the control mapping at the time.
Momentary
Add any control mapping to AmpKit and select "Momentary" when you want that control to only be active while you're pressing the button. For instance, if you map a control to the "Bright" toggle on an amplifier, that control will only turn on/off while you're actively pressing the button on your external controller.Expression
An expression control is specifically for expression pedals. This type of control alters the range of a setting. For instance, you can alter the Position value of the Wahbadoo pedal, or the Volume level of any pedal or amp.Invert Control
If you map a control to a Parameter - like the Volume of your amp, or the Gain level of a pedal - that Parameter will increase each time you press the control button. Select "Invert Control" if you want to decrease that same Parameter with a different control.